Hey there!
Since I’m bogged down with schoolwork for now, and new projects are probably on hold until the summer, I thought I’d keep this “retrospective” series going. Last time, I showed off one of my first puzzle projects, Puzzle X. This time, I want to look back at my first set of virtual reality projects from late last summer!

I got a hold of an HTC Vive virtual reality headset at the beginning of August 2018, right after I finished assembling my first homemade PC. I had a bit of experience with virtual reality (VR) before, though: I 3D printed a phone VR headset, then later upgraded to a GearVR headset from Samsung. Phone-based VR is pretty cool. It uses the gyroscope and accelerometer in your phone to create responsive 3D games and experiences. It’s cheap, accessible to nearly anyone with a smartphone in their pocket, and is plenty powerful for mobile games that will get anyone excited about VR. To anyone that hasn’t tried virtual reality before, this is the definitive way to try it out on a budget–it’s mind-blowing stuff.

In 2016, though, my buddy bought a Vive for himself. If phone-based VR is like Shrek, then desktop-computer-based VR is like Shrek 2. Phone-based VR is charming, has wide appeal, and is accessible to anyone, but sometimes struggles technically. The experience is still incredible, but desktop VR improves upon it in nearly every way. I mean, come on. Shrek 2 was so much better, let’s be real.
So, last summer, I finished building my new PC and bought my very own Vive to go with it. I was mainly drawn to buy the headset by a program called Gravity Sketch I had seen used in a few YouTube videos. It allows you to “paint” in 3D with a variety of tools. There are a number of tools at your disposal to make nearly any model you can think of. From modifiable brush solids, symmetry tools that mirror brush strokes to other planes, and shape tools for creating modifiable solids, Gravity Sketch has no shortage of intuitive features. The idea of modeling parts in virtual reality with your hands in real time was–and still is!–really impressive to me. I’m still waiting on a company to make a full CAD software for the platform, since that would be absolutely insane, but art is a great application for VR for now. I’ve certainly had a lot of fun with it so far!
Of course, one of the first things I wanted to try was to combine 3D printing with virtual reality. However, this is far from an original idea–some influential designers like Make Anything have already done exactly that–so I wanted to put a twist on it. I decided that, since my pimped-out Prusa has four materials to print with, I would try to make a few multi-color models. For whatever reason, my first few designs were cacti!

I began by playing around with the revolve tool, which creates a lofted profile that can later be modified in X and Z. Gravity Sketch allows you to change the shape of the profile from a few different given options–no way to make your own, unfortunately–and create “rings” of variable thickness. You can even opt to make the shape solid by upping the thickness slider to 100%, which helps make watertight .STLs for 3D printing. This is where I first got the idea to make cacti. One of the profiles, a hexagon, just happened to look very cactus-like when lofted in the right way, so I kept making more in different ways.
Three out of my four cacti–I, III, and IV–were made using the revolve tool. For example, one of my designs uses a spiky star profile for a ridged outer surface. However, since it’s near impossible to get the exact profile you’d like on the first try, Gravity Sketch has a neat feature that allows you to redefine nodes of curves, what they call “control points.”
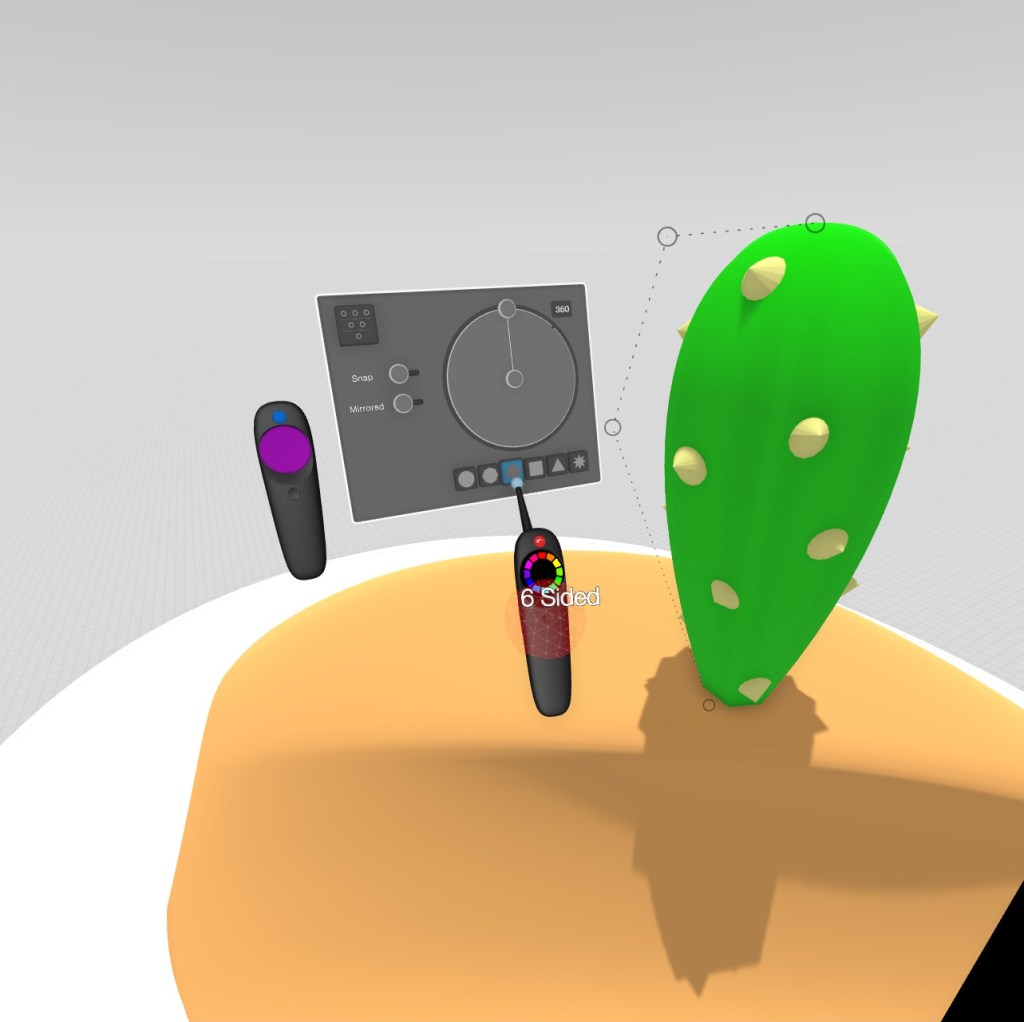
The control point editor is accessed by grabbing the desired curve and pressing the Menu button on the Vive controller. In this editor, you can select points on any curve or solid and move them in 3D space. In my case, I modified the revolve curve and simplified it by manually removing control points (it’s also possible to auto-simplify a curve in the menu). This is really useful for getting the right shapes you need on every stroke without requiring pinpoint precision on your first try.
On my first model, Cactus I, I created the spines by using the brush tool. This tool allows you to use a customizable solid to create free-form strokes with different shapes. For example, the cube brush makes square-shaped forms, with options to make the ends round or sharp. Although the tool is limited to a few solids, you’re able to shape them in so many ways that you’re hardly ever limited.
The brush shape I ended up using was the diamond shape, which I didn’t modify. Although the brush tool is specifically meant to create long strokes, I just tapped the Vive trigger to get sharp, diamond-shaped solids that I copied and pasted across the surface of the cactus. It ended up being a pretty efficient way to get the spines to look exactly like I wanted without too much effort.

I finished up the models using the curved surface tool to create the actual desert sand beneath the cacti. This tool is unique in that it uses both controllers to produce a surface that follows the movement of your hands. Using the same control point editor allowed me to get the surface to look exactly how I wanted. The surface does come out flat, though: in Gravity Sketch, there’s no way (at least that I’ve seen!) to thicken and cut a curved surface, but that can be done in post-processing.
The one trick up my sleeve that I haven’t mentioned yet is the method I used to get multi-color models from the software. This was actually much simpler than it might seem! In the menu, there’s a layer system, very similar to Photoshop and similar programs. This menu allows you to lock edits on that layer, change visibility, and, most importantly, export different layers as separate files.

In most FDM printing, multi-material model slicing works by combining multiple .STLs, each of which is printed in a different color, into a single sliced model. If you wanted to print a cube in two colors, for example, you would split the .STL into two half-cubes with a common origin. This allows a slicing program like Slic3r Prusa Edition to align the meshes back into a uniform cube with 2 colors. Luckily, since Gravity Sketch exports files with a common origin and uniform sizes, the transition from VR to PC is pretty painless here, apart from a little post-processing using Microsoft 3D Builder and MeshMixer. So, in this case, we’d export each color as a separate model in order to achieve a multiple color print!

Printing the models is pretty painless as well. Since they’re optimized for 3D printing, the only real challenge is slicing–and even that isn’t too difficult. I’m using Slic3r Prusa Edition (recently rebranded as PrusaSlicer with the 2.0.0 update), which is designed to be seamless with Prusa printers like my i3 MK2s MMU. If you happen to be in the same situation, just import all the models at once and tell Slic3r to consider all the models as a single multi-material part. Then, choose your settings, slice, and hit print!

Anyways, that about wraps up my first set of models from virtual reality! These prints are super fun to make and look great–though I might be a little biased. If you’d like to pick up some of my Desert Doodles, you can print one yourself from my Thingiverse listing, or just grab one from my shop: Cactus I, Cactus II, Cactus III, Cactus IV

This has been a really fun project to work on, so, if I get around to it, I’d love to make a “part 2” of this series and make some more little doodles! I might stick to the cactus theme, or maybe try something else entirely. Who knows!?
Anyways, thanks for dropping by, and keep on printing!
-Brent